SLAM 3.5 Sophus实践
前面理论讲述了很多,这里针对李群李代数部分做一个代码开发的补充
一、Sophus基础
前面配置环境的时候,我们就有安装一个Sophus库。李代数最早提出的是Sophus Lie,所以这个库就叫做Sophus了。
由于Eigen提供了很不错的几何模块,但没有提供李群李代数的支持,而这个Sophus库就支持。他是直接基于Eigen库开发的,所以不需要额外的依赖库了。
以下案例的头文件使用如下:
#include <iostream>
#include <cmath>
#include <Eigen/Core>
#include <Eigen/Geometry>
#include "sophus/se3.hpp"

using namespace std;
using namespace Eigen;- 声明一个旋转向量,并展示其旋转后的结果:
// 沿Z轴转90度的旋转矩阵
// 三维旋转向量可以用角轴来表示,利用Eigen库的AngleAxisd()角轴(旋转向量)函数
// 绕着单位方向向量\alpha = z轴(0,0,1)旋转模长为\theta = 90° = pi/2,
// 则\phi = \theta \alpha 再调用toRotationMatrix()函数从角轴表示的旋转向量转换为旋转矩阵
Matrix3d R = AngleAxisd(M_PI / 2, Vector3d(0, 0, 1)).toRotationMatrix();
// 或者四元数
Quaterniond q(R);
Sophus::SO3d SO3_R(R);              // Sophus::SO3d可以直接从旋转矩阵构造
Sophus::SO3d SO3_q(q);              // 也可以通过四元数构造
// 二者是等价的
cout << "SO(3) from matrix:\n" << SO3_R.matrix() << endl;
cout << "SO(3) from quaternion:\n" << SO3_q.matrix() << endl;
cout << "they are equal" << endl;
输出效果
SO(3) from matrix:
2.22045e-16          -1           0
          1 2.22045e-16           0
          0           0           1
SO(3) from quaternion:
2.22045e-16          -1           0
          1 2.22045e-16           0
          0           0           1
they are equal
- 使用对数映射获得李代数
// 使用对数映射获得它的李代数
Vector3d so3 = SO3_R.log();
cout << "so3 = " << so3.transpose() << endl;
// hat 为向量到反对称矩阵
cout << "so3 hat=\n" << Sophus::SO3d::hat(so3) << endl;
// 相对的,vee为反对称到向量
cout << "so3 hat vee= " << Sophus::SO3d::vee(Sophus::SO3d::hat(so3)).transpose() << endl;
输出结果:
so3 =      0      0 1.5708
so3 hat=
      0 -1.5708       0
 1.5708       0      -0
     -0       0       0
so3 hat vee=      0      0 1.5708
- 增量扰动模型的更新
// 增量扰动模型的更新
Vector3d update_so3(1e-4, 0, 0); //假设更新量为这么多
Sophus::SO3d SO3_updated = Sophus::SO3d::exp(update_so3) * SO3_R;
cout << "SO3 updated = \n" << SO3_updated.matrix() << endl;
输出结果:
SO3 updated =
          0          -1           0
          1           0     -0.0001
     0.0001 2.03288e-20           1
- 对SE(3)操作是类似的
// 对SE(3)操作大同小异
Vector3d t(1, 0, 0);           // 沿X轴平移1
Sophus::SE3d SE3_Rt(R, t);           // 从R,t构造SE(3)
Sophus::SE3d SE3_qt(q, t);            // 从q,t构造SE(3)
cout << "SE3 from R,t= \n" << SE3_Rt.matrix() << endl;
cout << "SE3 from q,t= \n" << SE3_qt.matrix() << endl;

// 李代数se(3) 是一个六维向量,方便起见先typedef一下
typedef Eigen::Matrix<double, 6, 1> Vector6d;
Vector6d se3 = SE3_Rt.log();
cout << "se3 = " << se3.transpose() << endl;

// 观察输出,会发现在Sophus中,se(3)的平移在前,旋转在后.

// 同样的,有hat和vee两个算符
cout << "se3 hat = \n" << Sophus::SE3d::hat(se3) << endl;
cout << "se3 hat vee = " << Sophus::SE3d::vee(Sophus::SE3d::hat(se3)).transpose() << endl;
输出效果:
SE3 from R,t=
2.22045e-16          -1           0           1
          1 2.22045e-16           0           0
          0           0           1           0
          0           0           0           1
SE3 from q,t=
2.22045e-16          -1           0           1
          1 2.22045e-16           0           0
          0           0           1           0
          0           0           0           1
se3 =  0.785398 -0.785398         0         0         0    1.5708
se3 hat =
        0   -1.5708         0  0.785398
   1.5708         0        -0 -0.785398
       -0         0         0         0
        0         0         0         0
se3 hat vee =  0.785398 -0.785398         0         0         0    1.5708
- 更新
// 最后,演示一下更新
Vector6d update_se3; //更新量
update_se3.setZero();
update_se3(0, 0) = 1e-4;
Sophus::SE3d SE3_updated = Sophus::SE3d::exp(update_se3) * SE3_Rt;
cout << "SE3 updated = " << endl << SE3_updated.matrix() << endl;
输出效果:
SE3 updated =
2.22045e-16          -1           0      1.0001
          1 2.22045e-16           0           0
          0           0           1           0
          0           0           0           1
二、使用Sophus评估轨迹误差
实际工程中,需要评估一个算法的估计轨迹与真实轨迹的差异来评价算法的精度。
真实轨迹Ground Truth往往是通过某些更高精度的系统获得**,**
估计轨迹是通过待评价算法的计算得到。
如何计算两条轨迹的误差?
考虑一条估计轨迹$T_{esti,i}$和$T_{gt,i}$,其中i=1, … , N。那我们可以定义一些误差指标来描述它们之间的差别。
误差指标有很多种。
- 常见的绝对轨迹误差(Absolute Trajectory Error,ATE)
$$
\mathbf{ATE}_{all}=\sqrt{\frac{1}{N}\sum_{i=1}^{N}\left\| \log(T_{gt,i}^{-1}T_{esti,i}) \right\|_2^2}
$$
实际上是计算每个位姿李代数的均方根误差(Root-Mean-Squared Error,RMSE),可以刻画两条估计的旋转和平移误差。
- 考虑平移误差的,定义绝对平移误差(Absolute Translational Error)
$$
\mathbf{ATE}_{trans}=\sqrt{\frac{1}{N}\sum_{i=1}^{N}\left\| trans(T_{gt,i}^{-1}T_{esti,i}) \right\|_2^2}
$$
式子中tran 函数表示取括号中元素的平移部分。从整条轨迹上看,
- 还可以定义相对误差,仅考虑i时刻到i+△t时刻的运动,那么**相对位姿误差(Relative Pose Error,RPE)**可以定义为
$$
\mathbf{RPE}_{all}=\sqrt{\frac{1}{N-\Delta t}\sum_{i=1}^{N-\Delta t}\left\| \log\left( (T_{gt,i}^{-1}T_{gt,i+\Delta t})^{-1}(T_{esti,i}^{-1}T_{esti,i+\Delta t})\right)^\vee \right\|_2^2}
$$
- 同样的,也可以只取平移部分:
$$
\mathbf{RPE}_{trans}=\sqrt{\frac{1}{N-\Delta t}\sum_{i=1}^{N-\Delta t}\left\| trans\left( (T_{gt,i}^{-1}T_{gt,i+\Delta t})^{-1}(T_{esti,i}^{-1}T_{esti,i+\Delta t})\right)^\vee \right\|_2^2}
$$
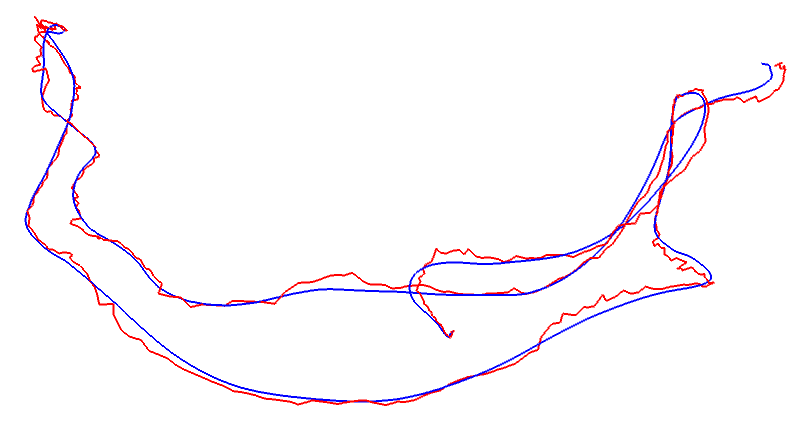
使用Sophus李代数库可以实现这部分轨迹误差的评估。首先需要准备数据,这里使用SLAM十四讲源码中已经给出了真实轨迹 groundtruth.txt 和 估计轨迹 estimate.txt,下面读取两条轨迹数据后,通过Sophus计算轨迹间误差,然后显示在Pangolin窗口中。
所需前置定义的一些内容:
#include <iostream>
#include <fstream>
#include <unistd.h>
#include <pangolin/pangolin.h>
#include <sophus/se3.hpp>
using namespace Sophus;
using namespace std;
//真实轨迹路径
string groundtruth_file = "./example/groundtruth.txt";
//估计轨迹路径
string estimated_file = "./example/estimated.txt";
void DrawTrajectory(const TrajectoryType >, const TrajectoryType &esti);
TrajectoryType ReadTrajectory(const string &path);初始化SE(3)
TrajectoryType ReadTrajectory(const string &path) {
  ifstream fin(path);//打开轨迹数据文件
  TrajectoryType trajectory;
  if (!fin) {
    cerr << "trajectory " << path << " not found." << endl;
    return trajectory;
  }
  while (!fin.eof()) {
    // 轨迹数据txt文件中每一行表示由时间戳、平移向量、旋转四元数构成的一个相机wi位姿
    double time, tx, ty, tz, qx, qy, qz, qw;
    fin >> time >> tx >> ty >> tz >> qx >> qy >> qz >> qw;
    // 使用轨迹数据中的旋转四元数和平移向量来初始化一个特殊欧式群SE(3)
    Sophus::SE3d p1(Eigen::Quaterniond(qw, qx, qy, qz), Eigen::Vector3d(tx, ty, tz));
    // 将使用李群表示的当前相机位姿存入轨迹变量中
    trajectory.push_back(p1);
  }
  return trajectory;
}-
计算
//定义一个特殊欧式群SE(3)的vector容器,并取个别名 typedef vector<Sophus::SE3d, Eigen::aligned_allocator<Sophus::SE3d>> TrajectoryType; int main(int argc, char **argv) { // 获取轨迹数据 TrajectoryType groundtruth = ReadTrajectory(groundtruth_file); TrajectoryType estimated = ReadTrajectory(estimated_file); // 检测读取的轨迹数据是否正常 assert(!groundtruth.empty() && !estimated.empty()); assert(groundtruth.size() == estimated.size()); // 算每个位姿李代数的均方根误差 RMSE (Root Mean Squared Error) // 也就是绝对轨迹误差 ATE (Absolute Trajectory Error) double rmse = 0; for (size_t i = 0; i < estimated.size(); i++) { // 获取轨迹中每个相机当前的估计位姿和真实位姿数据 Sophus::SE3d p1 = estimated[i], p2 = groundtruth[i]; // 根据每个真实数据和估计数据之间的位姿李代数的均方根误差公式RMSE(也就是绝对轨迹误差计算公式ATE) // 真实位姿的变换矩阵T的逆与估计位姿的变换矩阵相乘,取对数映射计算位姿李代数并归一化 double error = (p2.inverse() * p1).log().norm(); // 累加轨迹中每个相机位姿李代数误差的平方 rmse += error * error; } // 平均值 rmse = rmse / double(estimated.size()); // 根号 rmse = sqrt(rmse); cout << "RMSE = " << rmse << endl; DrawTrajectory(groundtruth, estimated); return 0; } -
绘制Pangolin
void DrawTrajectory(const TrajectoryType >, const TrajectoryType &esti) { // 创建一个名为Trajectory Viewer的3D可视化窗口,大小为1024 x 768 pangolin::CreateWindowAndBind("Trajectory Viewer", 1024, 768); // 开启更新深度缓冲区的功能,显示3D效果的时候需要打开,根据目标的远近自动隐藏被遮挡的模型 glEnable(GL_DEPTH_TEST); // 开启颜色混合模式,让物体显示具有半透明效果 glEnable(GL_BLEND); // 设置颜色RGBA混合因子,第一个参数为源因子,第二个参数为目标因子 glBlendFunc(GL_SRC_ALPHA, GL_ONE_MINUS_SRC_ALPHA); // 创建相机视图 pangolin::OpenGlRenderState s_cam( //设置相机内参(相机分辨率、焦距、相机光心)以及最近最远距离 pangolin::ProjectionMatrix(1024, 768, 500, 500, 512, 389, 0.1, 1000), // 设置视角,在世界坐标(0, -0.1, -1.8)处观察坐标原点(0, 0, 0) // 并设置Y轴朝上(0, -1, 0) pangolin::ModelViewLookAt(0, -0.1, -1.8, 0, 0, 0, 0.0, -1.0, 0.0) ); // 创建交互视图 pangolin::View &d_cam = pangolin::CreateDisplay() .SetBounds(0.0, 1.0, pangolin::Attach::Pix(175), 1.0, -1024.0f / 768.0f) .SetHandler(new pangolin::Handler3D(s_cam)); while (pangolin::ShouldQuit() == false) { // 清空颜色和深度缓存,为默认值 glClear(GL_COLOR_BUFFER_BIT | GL_DEPTH_BUFFER_BIT); // 激活相机视图 d_cam.Activate(s_cam); // 设置背景颜色为白色 glClearColor(1.0f, 1.0f, 1.0f, 1.0f); // 设置线条宽度为2 glLineWidth(2); for (size_t i = 0; i < gt.size() - 1; i++) { //设置真实轨迹的线段颜色为蓝色 glColor3f(0.0f, 0.0f, 1.0f); //开始画线 glBegin(GL_LINES); //获取真实轨迹中第 i 时刻和第 i+1 时刻用李群SE(3)表示的位姿 auto p1 = gt[i], p2 = gt[i + 1]; //取出第 i 时刻位姿的平移向量,作为该线段起点的顶点坐标 glVertex3d(p1.translation()[0], p1.translation()[1], p1.translation()[2]); //取出第 i+1 时刻位姿的平移向量,作为该线段终点的顶点坐标 glVertex3d(p2.translation()[0], p2.translation()[1], p2.translation()[2]); //画线结束 glEnd(); } //遍历估计轨迹中的所有位姿数据 for (size_t i = 0; i < esti.size() - 1; i++) { //设置估计的轨迹线段为红色 glColor3f(1.0f, 0.0f, 0.0f); //开始画线 glBegin(GL_LINES); //获取估计轨迹中第 i 时刻和第 i+1 时刻用李群SE(3)表示的位姿 auto p1 = esti[i], p2 = esti[i + 1]; //取出第 i 时刻位姿的平移向量,作为该线段起点的顶点坐标 glVertex3d(p1.translation()[0], p1.translation()[1], p1.translation()[2]); //取出第 i+1 时刻位姿的平移向量,作为该线段终点的顶点坐标 glVertex3d(p2.translation()[0], p2.translation()[1], p2.translation()[2]); //画线结束 glEnd(); } //交换帧和处理事件 pangolin::FinishFrame(); //睡眠5毫秒 usleep(5000); } }效果:


